Project Phasing in Revit: Managing Demolition Through New Construction
Phasing is one of the most powerful — and most frequently misconfigured — tools in Revit. On renovation projects, a phasing setup that isn’t properly established tends to reveal itself at the worst possible time: an element reassigned from existing to demolished suddenly hides hosted components, infill walls appear where doors used to be, and views stop matching what the design team expects to see on the sheet.
None of this is a defect in the software. Revit’s phasing system is strictly logical, and once its underlying model is understood, it behaves predictably on projects of any size. In this post, I’ll walk through the complete demolition-to-new-construction workflow: how element lifecycles work, how to structure your project phases, how phase filters control what appears in each view, and the field-tested practices we teach in our Revit courses to keep renovation documentation clean and coordinated.
1. The Core Concept: Every Element Has a Lifecycle
The single most important principle in Revit phasing is this: every element in the model exists in time. Each element is created at some point in the project timeline, and it may later be removed. Revit tracks this lifecycle through two instance properties available in the Properties palette of every model element (see Figure 1):
- Phase Created — the phase in which the element is built.
- Phase Demolished — the phase in which the element is removed.
Every phasing condition on a renovation project reduces to a combination of these two properties:
| Element Condition | Phase Created | Phase Demolished |
| Existing to Remain | Existing | None |
| To Be Demolished | Existing | New Construction |
| New Work | New Construction | None |
| Temporary Work | New Construction | New Construction |
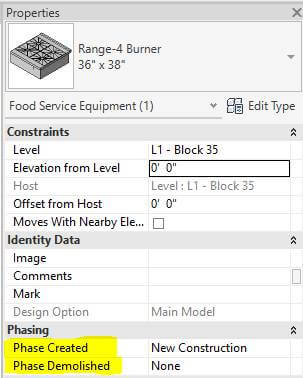
Figure 1: Phase Created and Phase Demolished instance properties in the Properties palette.
A common modeling error worth calling out: a demolished element is never created in the New Construction phase. If a wall is being demolished, it must be assigned Phase Created: Existing and Phase Demolished: New Construction. Modeling demolition any other way will produce views that do not read correctly under standard phase filters.
2. Setting Up Project Phases: Keep the Structure Lean
Project phases are managed from the Manage tab > Phases. Out of the box, Revit provides two phases — Existing and New Construction (see Figure 2) — and for the large majority of renovation projects, this default structure is exactly what we recommend.
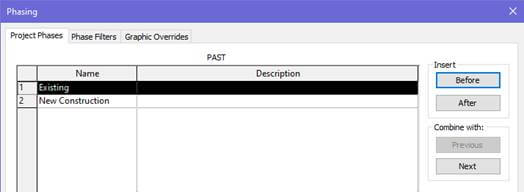
Figure 2: The Phasing dialog with Revit’s default Existing and New Construction phases.
A frequent misstep I see in project audits is creating a separate phase for every construction milestone — a Demolition phase, a Framing phase, a Finishes phase, and so on. This multiplies the number of view configurations that must be managed, complicates element tracking, and rarely reflects how the documentation set is actually organized.
Our recommended rule of thumb: if work happens within the same construction contract and timeframe, keep it in the same Revit phase. Demolition is not a standalone phase — it is the first activity within the New Construction phase, and Revit’s phase filters are designed around that assumption.
3. Controlling Presentation: Phase Filters and Graphic Overrides
Once elements are correctly assigned in time, the next step is controlling how each view displays them. This is handled by Phase Filters and Graphic Overrides, both found under Manage > Phases.
Relative to the phase assigned to a given view, Revit classifies every element into one of four phase statuses:
- New — created in the view’s current phase.
- Existing — created in an earlier phase and still in place.
- Demolished — created in an earlier phase and removed in the current phase.
- Temporary — created and removed within the same phase.
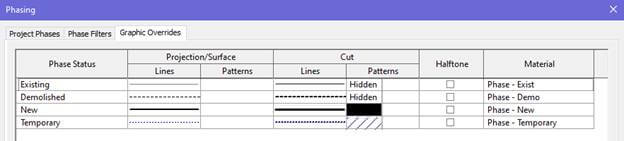
Figure 3: Graphic Overrides define how each phase status displays — line weights, halftone, and material overrides.
The Two View Configurations That Do Most of the Work
A complete renovation set can typically be documented with just two primary view configurations, both assigned to the New Construction phase (see Figure 4):
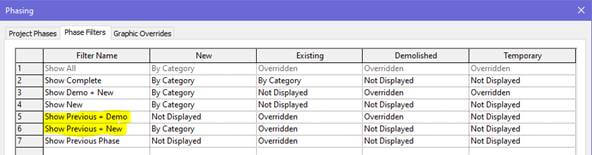
Figure 4: The Phase Filters tab, including Show Previous + Demo and Show Previous + New.
- The Demolition Plan — View Phase: New Construction, Phase Filter: Show Previous + Demo. Existing elements display in halftone, and demolished elements display with their demolition override (typically dashed), making the scope of removal immediately legible.
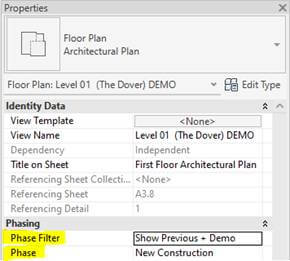
Figure 5: A demolition plan using Show Previous + Demo — existing work in halftone, demolished work dashed.
- The Proposed Plan — View Phase: New Construction, Phase Filter: Show Previous + New. Demolished elements are suppressed entirely, existing elements recede in halftone, and new construction reads with full line weight.
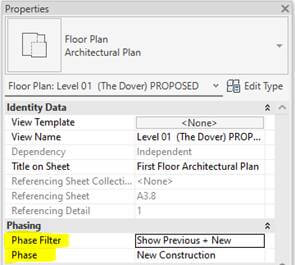
Figure 6: A proposed plan using Show Previous + New — demolished elements suppressed, new work at full line weight.
4. Executing Demolition: The Demolish Tool
While the Phase Demolished property can be set directly in the Properties palette, the more efficient method for demolishing elements in bulk is the Demolish tool on the Modify tab (the hammer icon, keyboard shortcut DM). The recommended workflow:
- Open the demolition plan view (Phase: New Construction / Filter: Show Previous + Demo).
- Activate the Demolish tool.
- Select the elements to be removed. Each element updates immediately to its demolished graphic style.
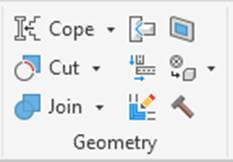
Figure 7: The Demolish tool on the Modify tab.
Because the tool simply writes the current view’s phase to the element’s Phase Demolished property, mistakes are easy to reverse: select the element and set Phase Demolished back to None in the Properties palette.
5. Best Practices from Our Revit Training Courses
These are the phasing practices we emphasize in our instructor-led Revit courses — each one addresses an issue we regularly encounter when auditing renovation models:
- Account for hosted elements. Demolishing a wall automatically demolishes the doors and windows it hosts. To replace a window while retaining its host wall, demolish only the window — Revit will display an infill patch where the opening was.
- Rooms are phase-specific. Rooms placed in the Existing phase do not carry forward automatically. New Room elements must be placed in New Construction views, and room schedules should be filtered by phase accordingly.
- Duplicate views with detailing. When building out Existing, Demolition, and Proposed plans, use Duplicate with Detailing so annotations and dimensions carry over for editing rather than being recreated from scratch.
- Confirm the view phase before modeling. If newly drawn walls immediately display halftone or dashed, check the view’s Phase property — you are likely modeling into a view assigned to the Existing phase.
Wrapping Up
Revit phasing rewards a disciplined setup. Treat demolition as the opening step of the New Construction phase rather than a phase of its own, assign element lifecycles deliberately, and establish your phase filters and view templates early — and the renovation documentation largely takes care of itself, staying coordinated across every plan, elevation, and schedule in the set.
If your team is taking on renovation work in Revit, our Autodesk Certified Instructors cover phasing, design options, and renovation documentation workflows in depth in our instructor-led Revit courses — offered online live and in person at our Walnut Creek and Sacramento training centers. Visit cadmasters.com to view the current training schedule, or contact us to discuss a customized training plan for your team.
Elizabeth Valerio is a CAD Masters instructor and Engineer-in-Training (EIT), teaching Revit workflows for architecture and engineering professionals. CAD Masters is an Autodesk Authorized Training Center and Autodesk Gold Partner. Our instructors hold Autodesk Certified Instructor credentials at the Gold and Platinum levels. We provide comprehensive Revit, AutoCAD, Civil 3D, and Autodesk platform training for architecture, engineering, and construction professionals across all disciplines.