Lofted Revit Mass
Lately I was working on a conceptual building design. I wanted to create an arched glass roof with a non-uniform shape. I planned to use a curtain system on an in-place mass. Every time I tried to finish, I’d get errors such as “Line is too short“, “Can’t regenerate family” or “Mass contains no solid geometry.” But there didn’t appear to be any short lines and I had just created solid geometry.
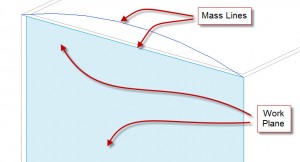
So, I tried a similar in-place mass in a new drawing and got it to work. The solution came from using properly setup work planes. Your mass lines don’t have to fall within the extents of your work plane, but they do have to fall on that plane in general.
Begin by creating a new In-Place Mass.
- On the Massing & Site tab, on the Conceptual Mass tab, click In-Place Mass.
- On the Modify tab, in the Draw panel, select a command such as Line.
- On the Modify tab, in the Work Plane panel , click Set.
- In the model, select your wall face
- Start drawing
Once I drew the arc you see below I clicked the line tool without pressing Esc so that I could continue drawing on the same plane. You can use this technique to avoid re-picking the work plane.

- On the Modify tab, on the Draw tab, click Reference.
- In the options bar select 3D Snapping.
- Draw the reference line beginning at the midpoint snap.
- If you are having difficulties with the midpoint snap, right-click and point to Snap-Overrides, click Midpoints.
Now, just like drawing the cross section using the wall face, instead this time we’ll use the reference plane you just created:
- On the Modify tab, in the Draw panel, select Model.
- On the Modify tab, in the Draw panel, select a command such as Line.
- On the Modify tab, in the Work Panel panel , click Set.
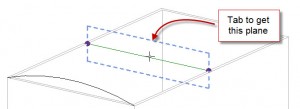
- In the model, hover the cursor over the middle of the reference line
- Press tab multiple times until the appropriate plane appears
- Click to select the reference plane
- Draw the cross section
To finish up the massing object:
- Create the closing section on the opposite wall.
- Select the individual segments that the mass will use.
- Do not select the reference line.
- On the Modify tab, click Create-Form, click Solid Form.
Click Finish Mass and your cross sections become a beautiful in-place mass.


