AutoCAD Architecture Custom Room Area Tags
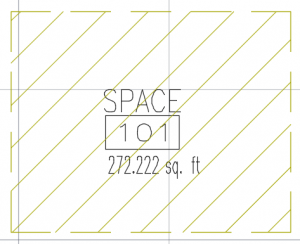
In AutoCAD Architecture, the Room Tag Style that comes with the program will read out the Room name and number for a Space. Often, you may also want to print out the area of the Space (in sq ft).
Here is a step by step guide on how to create your own Room Tag that includes the area. There are several more properties you can potentially add to the Tag. This guide will help you get started in tag customization, by creating your first custom Room Tag.
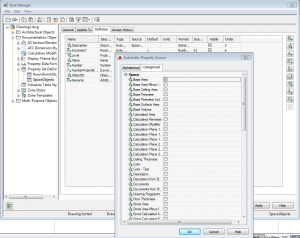
First, the automatic property called “BaseArea” needs to be added to a Property Set Definition. I’m adding it to the “SpaceObjects” Property Set Definition.
1. In the Manage Ribbon, open the Style Manager. Under Documentation Objects find Property Set Definitions. Select “SpaceObjects”.
2. In the Definition tab click on the “Add Automatic Property Definition” Button.
3. In the new window, check mark “Base Area”.
Here’s a picture of how to add the area automatic property. Click on the image to see a larger version.
Next, we create the objects that will become the block used for the Tag.
4. In the model space, set the annotation scale to 1:1.
This step is necessary because Tags in AutoCAD Arch are annotative (auto-scaling). Changing the annotation scale in the status bar to 1:1 makes sure the Tag’s text will be the correct size.
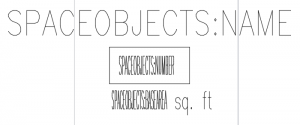
5. Place a Room Tag. Explode the Room Tag until it reads the Attribute Definition Tag names.
6. Copy the “SPACEOBJECTS:NUMBER” Attribute and edit to create an Attribute with Tag “SPACEOBJECTS:BASEAREA”.
7. Add text if you want the units to be displayed.
Here is a picture of what my objects look like at this point.
Now we create the Tag using the objects previously drawn.
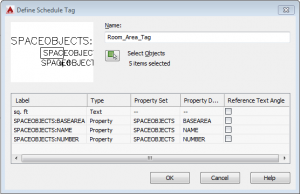
8. In the Annotate Ribbon, expand the Scheduling panel. Select “Create Tab”.
9. On screen, select the objects you would like included in the Tag block (Attributes, Lines, Text).
10. In the Define Schedule Tag Dialog Box, type in a new name for the Tag. I’m using Room_Area_Tag.
11. Double check that the labels are assigned the correct properties and click the OK button.
12. Specify an insertion point to place the new Room Tag.
Finally we get to place the custom Tag.
13. Use the Room Tag tool to place Tags over the Spaces (rooms).
14. Select the Tag and use the properties window to change the Tag Definition to “Room_Area_Tag”.
Hope you enjoyed this post!


